← Back to Learn Hub

Deeper Mechanics · Variable

Human Design Variable: The Four Arrows Explained

The four arrows at the top of your Bodygraph reveal your cognitive architecture, showing how you're designed to take in nourishment, find the right environment, process awareness, and perceive the world.

| What Is Variable in Human Design?

This is one of the most advanced areas of Human Design. It does not replace Type, Strategy, Authority, or Profile, and it should not be treated as a shortcut around foundational mechanics. What Variable does offer is a more precise understanding of how your body and mind are configured to take in, process, and orient awareness.

Variable refers to the four arrows shown at the top of the Bodygraph. Each arrow points either left or right, creating a four-part pattern that reflects the way your design is differentiated at a subtle level.

Variable is often spoken about loosely, but it is not a personality label. It is a substructure framework that describes orientation. Properly understood, it shows how the body is designed to operate and how the mind is designed to view and frame experience.

Important

Variable depends on an accurate birth time. Even small differences can change the arrow orientation.

The Four Arrows and What They Represent

Variable is based on Tone and appears in the Bodygraph as the four arrows at the top of the chart, showing the left or right orientation of key aspects of your design.

Top Left Arrow

Determination

Active
Passive

Describes how the body and brain are designed to take in and process information. Belongs to the body side of Variable.

Bottom Left Arrow

Environment

Observed
Observer

Describes how the body integrates within the correct environment. Belongs to the body side of Variable.

Top Right Arrow

Motivation

Strategic
Receptive

The deeper mechanic connected to Mind Style and mental awareness. Belongs to the personality side of Variable.

Bottom Right Arrow

Perspective

Focused
Peripheral

Describes how the mind is designed to view the environment correctly. Belongs to the personality side of Variable.

These Variable mechanics have dedicated pages of their own. Here, they matter because they form the structure of Variable in Human Design. Explore each one in more detail below:

| Body Side and Mind Side

Variable is easier to understand when you separate the arrows into two sides.

Body Side

The left-side arrows correspond to the design side of the chart:

  • Brain Style
  • Environment Style

These arrows speak more directly to how the body takes in and processes information, and how it integrates within the correct environment.

Mind Side

The right-side arrows correspond to the personality side of the chart:

  • Mind Style
  • Perspective

These arrows speak more directly to how the mind thinks and how it views the environment correctly.

This is why Variable should be read as a system rather than as four disconnected labels. The arrows only operate correctly as a chain: correct cognition in the brain leads to the correct environment; the correct environment locks in the correct view; and the correct view provides the correct information for the mind to become a unique outer authority. Until the body is aligned correctly, neither correct view nor correct mental functioning is possible.

| Left and Right Variable Orientation

The central distinction in Variable is whether an arrow points left or right. These are not value judgments. Left is not superior to right, and right is not more evolved than left. They describe different modes of orientation.

← Left-Facing Variable

Strategic focus

Consistency in a defined field

Defined directionality

Structure

Specificity

Active engagement

Concentrated attention

→ Right-Facing Variable

Receptivity

Openness

Flexibility

Peripheral awareness

Panoramic attention

Non-strategic processing

Non-active engagement

The mistake most people make is confusing Variable with the old notion of left-brain and right-brain hemispheres. That misses the point. Left and right in Variable describe modes of operation within the system, not a simplistic split between analytical and logical versus creative and intuitive styles of thinking.

| The 16 Variable Configurations

Because each of the four arrows can point in one of two directions, there are 16 possible Variable configurations. What matters is not memorizing the code for its own sake, but understanding that each arrangement creates a distinct relationship between how the body and brain take in and process information, how the body integrates within the correct environment, how the mind views the environment, and how the mind thinks.

What a Configuration Can Reveal

The 16 Variable configurations showing all combinations of left and right arrows across Brain Style, Environment Style, Mind Style, and Perspective

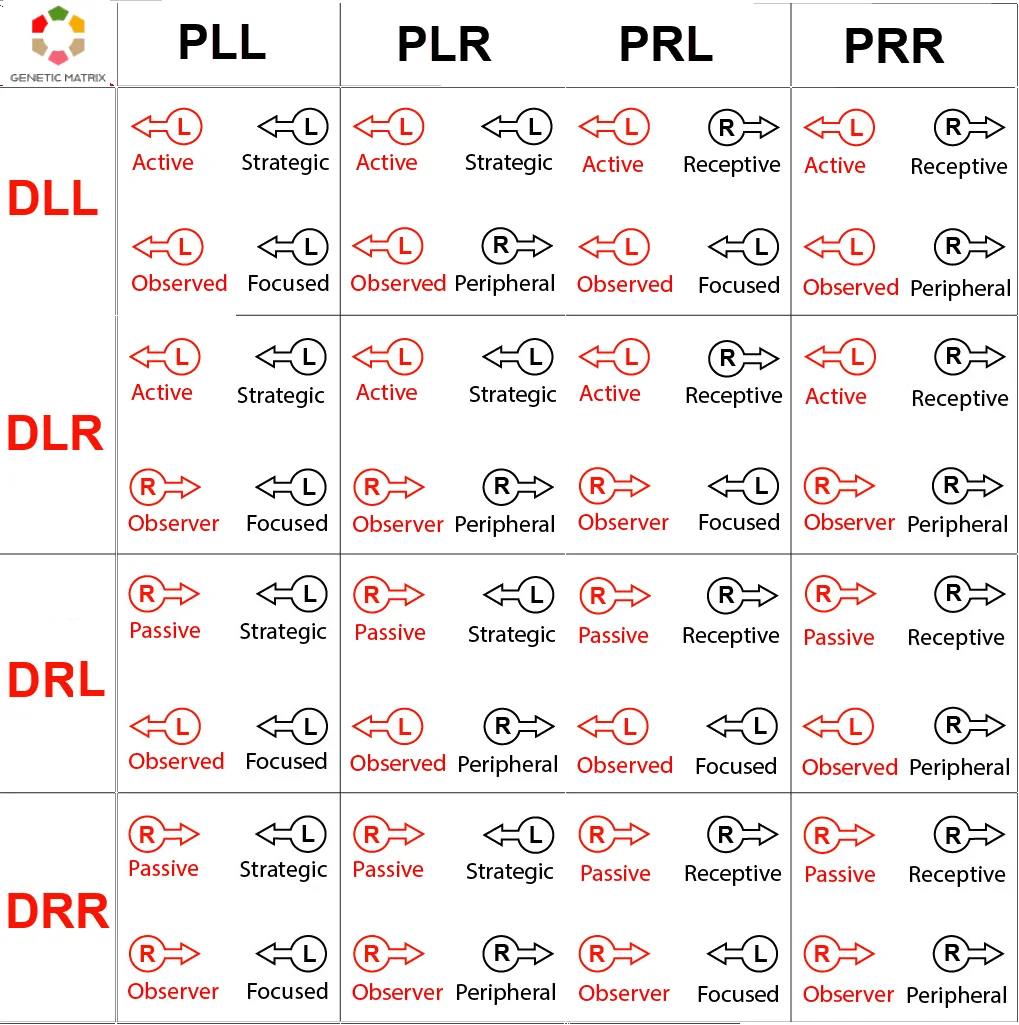
The chart above shows the 16 possible Variable arrangements created by the four arrows. These are read as integrated patterns of body and mind orientation, not as isolated codes.

How to Read a Variable Code

Code Position Left (←) Right (→)
D _ _ Design (body side) -
D L_ or D R_ 1st letter: Brain Style (top-left arrow) L = Active R = Passive
D _L or D _R 2nd letter: Environment Style (bottom-left arrow) L = Observed R = Observer
P _ _ Personality (mind side) -
P L_ or P R_ 1st letter: Mind Style (top-right arrow) L = Strategic R = Receptive
P _L or P _R 2nd letter: Perspective (bottom-right arrow) L = Focused R = Peripheral

Note: On the Personality side, the correct order for Variable correctness is Perspective first and Mind Style second. The standard display convention has been retained here, even though it was originally specified incorrectly by Ra Uru Hu and later acknowledged as such.

Each configuration combines these four mechanics into a single Variable pattern. The rows describe the Design side through Brain Style and Environment Style. The columns describe the Personality side through Mind Style and Perspective. Read them together as an integrated pattern of body and mind orientation, not as four isolated labels.

| What Variable Actually Tells You

Variable is valuable because it refines orientation. It does not tell you whether you are more conscious, more spiritual, more advanced, or more aligned than anyone else. What it can indicate with more precision is:

This is why Variable matters to serious Human Design students. It is not a branding device. It is a description of how your system is configured beneath the more familiar chart layers, revealing the pattern of your absolute uniqueness at its highest level.

| Where Variable Appears in the Bodygraph

Variable appears as the four arrows at the top of the Human Design chart, positioned around the head area and the nodes area. Each arrow points either left or right. Together, they form the full Variable configuration.

Human Design Bodygraph showing the four Variable arrows positioned around the head and nodes area
Arrow Position Variable Area Broad Domain
Top Left Brain Style Body / intake and processing
Bottom Left Environment Style Body / environmental integration
Top Right Mind Style Mind / thinking style
Bottom Right Perspective Mind / view

The left-side arrows belong to the Design side of Variable. The right-side arrows belong to the Personality side. Read together, they show how body and mind are oriented through Variable.

| Variable and the Deeper Mechanics

Variable is closely related to the deeper mechanics of Human Design, but it should not be confused with them. The arrows point to major advanced domains such as Tonal Cognition, Determination, Environment, Perspective, and Motivation. Those topics can and should be studied in their own right. This page is about the Variable system itself rather than trying to teach all of those mechanics in full. See the Deeper Mechanics section for deeper insight into these areas.

That distinction matters. If a Variable page tries to become a complete guide to PHS, Environment, Motivation, and Perspective all at once, it loses topical clarity and becomes weaker for both search and serious users.

Common Errors in Variable Interpretation

Treating Left as Better Than Right

Variable is not hierarchical. Left and right are different orientations, not rankings.

Using Variable to Bypass Strategy and Authority

Variable is advanced substructure. It does not override the foundations of the chart. In fact, it does not function correctly without Strategy and Authority.

Reading One Arrow in Isolation

Each arrow can be described individually, but the real meaning emerges through the full four-arrow pattern. You are a holistic whole; each arrow on its own is useful for study, not for living.

Turning Variable Into Personality Branding

Variable describes orientation and ultimate differentiation. It is not a branding device, a slogan, or a comparison tool.

Forcing Yourself Into a Preferred Style

This is pure not-self behavior. Your Variable is correct as it is, and you cannot be fulfilled by forcing yourself into any other modality.

| Frequently Asked Questions

What is Variable in Human Design?
Variable is the four-arrow system at the top of the Bodygraph. It shows how deeper mechanics such as Brain, Environment, Perspective, and Mind are oriented.
What do the arrows mean in Human Design?
The arrows show whether each area is configured with a left-oriented or right-oriented mode of functioning. Broadly speaking, this reflects strategic versus receptive orientation.
How many Variable configurations are there?
There are 16 total configurations, because each of the four arrows can point in one of two directions.
Does Variable matter more than Type or Authority?
No. Variable is advanced and should be approached after foundational mechanics are understood and lived.
Can your Variable change?
No. Your natal Variable configuration does not change. What can change is your clarity and lived relationship to it.

| Related Topics

Explore Your Variable

To see your Variable, you need an accurate Human Design chart with a reliable birth time and access to the Variable arrows. Genetic Matrix free charts do not include Variable arrows, so membership is required to view the full arrow configuration.

Get Pro →